Unfortunately I don`t have a 20/20 vision, but now at least I have a Panasonic 20mm lens that I hope will inspire my photographic vision and get the creative juices flowing.
The results so far from this lens are really great. This, however, should come as no surprise considering the abundance of positive reviews out there on the web.
I like the fact that it offers only one angle of view, making me stop, think and work harder to get the pictures I want.
And the shallow depth of field. Ah, how it brings back good memories from the nifty fifty I started out with many years ago.
My first outing with this lens was a few weeks ago, when I decided to take advantage of the nice weather and start my commute to work, the day, or rather evening, before.
I headed out the door at 9 pm, on foot, and got to experience a nice sunset. I tad too late for the perfect light, but nice nevertheless to be out and about on this late summer evening.
My intention was to walk to a place I know I can pitch my tarp, about 1.5 hours away from my doorstep.
It`s a nice grassy meadow which offers a nice view over the Askøy bridge.
The late start and the coming of autumn meant that daylight was fading fast and by the time I had pitched my tarp and made a cup of hot cocoa, it was quite dark.
Sleep came easily but I was awoken around 01.30 am by a stray dog running around close to my tarp, bringing forth mental images of the Hound of Baskerville.. It disappeared before I had the chance to investigate if it had a name tag. Hopefully it returned to its owner. The rest of the night went by peacefully, and, going by my results so far, I have to give two thumbs up to my new Thermarest Neoair Xtherm. It really is quite comfortable :)
The next morning, after a quick coffe and breakfast, I jogged to the nearest bus-stop and joined the "world" again. I have to say this particular trip ranks very highly on my top-ten list, as far as commuting goes :)
Showing posts with label Gear. Show all posts
Sunday, September 9, 2012
Thursday, August 2, 2012
On yer bikes
The weather this summer has not been the greatest. I guess Joe, Beni and Marco can vouch for that..
The first couple of weeks of our family holiday consisted mainly of rain, wind and fog. If we did not have a 4 month old baby, we would probably jump on a plane and fly south, to warmer climates. Ah well, we stuck with it and when we arrived back in Bergen for our second half of holiday, temperatures were higher and that yellow thing in the sky could be seen more often.
Being back in Bergen also meant that I had all my toys at my disposal again, and with a little negotiation I could land a bikepacking deal. It had been far to long since I had my Fargo out on an overnighter.
As this would be a short overnighter I chose to explore the island of Askøy, just north of where we live. I had read on some forums about mountainbikepotential/routes in a forest on this island, and set course for this forest. I packed and got ready and left about 8 pm, so not excactly an alpine start to this trip.
The first part of the route I had biked a few times before, but it was nice to be rolling along with a complete bikepackingkit. The Salsa Fargo works superbly for this.
My route would be on the east coast of the island, as the roads here have less traffic, and offer nice views of the sea. Weatherwise this was one fine evening, and I took great pleasure riding along in my new Rab Meco 120 short sleeve shirt. This shirt impressed my with its fit, long tail for bikeriding, how quickly it dried and, last but not least, according to my wife, the gray colour suits me :)
I was in no rush so I stopped by a few places that looked interesting, as this communal recreation spot
http://www.bof.no/Omrader/Askoy/009_solnes.htm
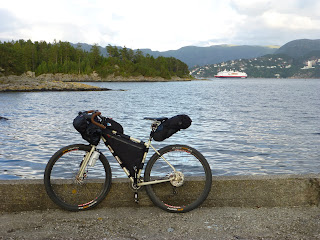
It was here I decided to take the obligatory "bike in forground and something else in the background" pictures and my dear Fargo was almost swallowed by King Neptune. I propped it up nicely along the concrete wall , stepped back to take a picture and to my dismay could see my bike slowly tipping and waving goodbye to its owner. My swift recovery was worthy of an olympic medal...
After a successful rescue, and the obligatory look around to see if anyone had seen this daft biker, the damage report was thankfully only a few minor scratches and some ripped handlebar tape. And a bruised ego.
I guess there is a reason on most bikepackingpictures the bike is laying on the ground...
Anyways, I continued along the scenic route I had chosen and soon left the tarmac in favor of the last stretch on gravel to where I would look around for a spot to camp. Using google maps (what an amazing time we live in with such technology at our disposal..) I had noticed a small lake called Fjellvannet which looked promising. Btw Fjellvannet (Mountain Lake) is an odd name for a lake 53 meters above sealevel, if you ask me...
My originally planned site looked a bit boring so I kept on riding, and, literally, just around the corner, I found a really nice spot to pitch my tarp. Offering flat ground, access to running water and the lake itself, it fit the bill as a perfect campsite. Seemed to be plenty of fish here as well, so next time I will bring my Tenkara rod.
The rest of the evening was spent tinkering around setting up my good old Integral Designs Siltarp 2 in bikepacking mode, eating, reading and generally enjoying myself. Tips and tricks on how to do this courtesy of The Traveling Vagabond http://thetravelingvagabond.com/tips-techniques/2011/12/14/tarps-tarps-more-tarps.html
I woke up during the night to the familiar sound of rain, but come morning, the sun was shining again, and I readyfied myself for some technical riding. I had no idea what it would look like, and truth be told, the tracks here were above my skillevel. Steep, rocky and rather muddy. Perhaps not terrain for a mountainbike novice. Ah well, if I ever attend the Iditarod Trail in some distant future, I guess some experience pushing bikes in bad conditions is handy :)
After a short de-tour to another recreation area, Kollevågen to check out the spot where I camped last summer on a kayaktrip, I headed back to our home and started a new day with my family.
Summer holiday, ain`t it grand!
The first couple of weeks of our family holiday consisted mainly of rain, wind and fog. If we did not have a 4 month old baby, we would probably jump on a plane and fly south, to warmer climates. Ah well, we stuck with it and when we arrived back in Bergen for our second half of holiday, temperatures were higher and that yellow thing in the sky could be seen more often.
Being back in Bergen also meant that I had all my toys at my disposal again, and with a little negotiation I could land a bikepacking deal. It had been far to long since I had my Fargo out on an overnighter.
As this would be a short overnighter I chose to explore the island of Askøy, just north of where we live. I had read on some forums about mountainbikepotential/routes in a forest on this island, and set course for this forest. I packed and got ready and left about 8 pm, so not excactly an alpine start to this trip.
| Salsa Fargo and Hurtigruten in the background |
The first part of the route I had biked a few times before, but it was nice to be rolling along with a complete bikepackingkit. The Salsa Fargo works superbly for this.
| Complete bikepacking setup |
My route would be on the east coast of the island, as the roads here have less traffic, and offer nice views of the sea. Weatherwise this was one fine evening, and I took great pleasure riding along in my new Rab Meco 120 short sleeve shirt. This shirt impressed my with its fit, long tail for bikeriding, how quickly it dried and, last but not least, according to my wife, the gray colour suits me :)
I was in no rush so I stopped by a few places that looked interesting, as this communal recreation spot
http://www.bof.no/Omrader/Askoy/009_solnes.htm
It was here I decided to take the obligatory "bike in forground and something else in the background" pictures and my dear Fargo was almost swallowed by King Neptune. I propped it up nicely along the concrete wall , stepped back to take a picture and to my dismay could see my bike slowly tipping and waving goodbye to its owner. My swift recovery was worthy of an olympic medal...
After a successful rescue, and the obligatory look around to see if anyone had seen this daft biker, the damage report was thankfully only a few minor scratches and some ripped handlebar tape. And a bruised ego.
I guess there is a reason on most bikepackingpictures the bike is laying on the ground...
Anyways, I continued along the scenic route I had chosen and soon left the tarmac in favor of the last stretch on gravel to where I would look around for a spot to camp. Using google maps (what an amazing time we live in with such technology at our disposal..) I had noticed a small lake called Fjellvannet which looked promising. Btw Fjellvannet (Mountain Lake) is an odd name for a lake 53 meters above sealevel, if you ask me...
My originally planned site looked a bit boring so I kept on riding, and, literally, just around the corner, I found a really nice spot to pitch my tarp. Offering flat ground, access to running water and the lake itself, it fit the bill as a perfect campsite. Seemed to be plenty of fish here as well, so next time I will bring my Tenkara rod.
The rest of the evening was spent tinkering around setting up my good old Integral Designs Siltarp 2 in bikepacking mode, eating, reading and generally enjoying myself. Tips and tricks on how to do this courtesy of The Traveling Vagabond http://thetravelingvagabond.com/tips-techniques/2011/12/14/tarps-tarps-more-tarps.html
| Next time I will bring my Tenkara rod |
I woke up during the night to the familiar sound of rain, but come morning, the sun was shining again, and I readyfied myself for some technical riding. I had no idea what it would look like, and truth be told, the tracks here were above my skillevel. Steep, rocky and rather muddy. Perhaps not terrain for a mountainbike novice. Ah well, if I ever attend the Iditarod Trail in some distant future, I guess some experience pushing bikes in bad conditions is handy :)
| Morning mist |
| An easy section |
After a short de-tour to another recreation area, Kollevågen to check out the spot where I camped last summer on a kayaktrip, I headed back to our home and started a new day with my family.
| Pardon the soggy pitch.. |
Summer holiday, ain`t it grand!
Tuesday, July 17, 2012
Rubber duck fun
I like my packraft.
It`s a very versatile craft, handy both for rivers, lakes, fishing, bikepacking, backpacking etc etc
But, sometimes, you just need to have a bit of fun.
So today I wanted to follow up my night on top of a flipped Denali Llama, and explore how stable it is (conclusion, really stable) and generally just goof around, playing fetch with my son.
Below is a totally un-cut version, following no advice whatsoever from this great article on making better adventure videos http://www.alastairhumphreys.com/2012/07/how-to-film-expedition/
It`s a very versatile craft, handy both for rivers, lakes, fishing, bikepacking, backpacking etc etc
But, sometimes, you just need to have a bit of fun.
So today I wanted to follow up my night on top of a flipped Denali Llama, and explore how stable it is (conclusion, really stable) and generally just goof around, playing fetch with my son.
Below is a totally un-cut version, following no advice whatsoever from this great article on making better adventure videos http://www.alastairhumphreys.com/2012/07/how-to-film-expedition/
Wednesday, May 23, 2012
A bivi in Bergen
I therefore decided to go for a spur of the moment bivi, to the mountains nearby my city.
The plan was to bring as little as possible, and just go.
And I went.
And I enjoyed it immensely!
I was not away for 24 hours so I guess you could call it a 12`er :)
| First proper backpacking trip with my new huckePACK. I think we will be good friends :) |
| Lots of people out this evening |
| Jetboil Ti in action |
| Ulriken by night |
After a good nights sleep it was straight to work, take a shower, and start a new day in the city.
It won`t be the last time!
| Not a lot of traffic up in the mountains at 7AM on a wednesday morning :) |
| The city of Bergen, ready for a new day |
Monday, May 21, 2012
The small pack with the big heart
In this post I wanted to share with you some of my impressions on one of my favorite packs, the Goruck GR1.
I`ve had my Goruck GR1 pack for 7 months now, and it`s easily my most used pack. Unlike my (ultra)lightweigt packs which only see the light of day every odd weekend.
This black beauty is sleek, inconspicous, tough as a nail, and also comfortable to carry. What more could you ask for?
Hardly lightweight by any standards, but, in my quiver of packs, this is the one that I could pass on to my children. And, I suspect this will be one of my final choices as well.
I also like the values of Goruck as a company, to build something that will last, to make a new classic.
There are plenty of other reviews out there on the web, singing its praise, so I will continue with a picture of the contents on a recent trip. It`s a mixture of bringing stuff back home to wash and electronics, and truth be told I did`t pay a lot of attention while packing.. But I`m suprised at how much I could fit in to those 26 liters.
It`s also a first attempt at using ThingLink. Now, let`s see, how do we do this thing?
/ odd
I`ve had my Goruck GR1 pack for 7 months now, and it`s easily my most used pack. Unlike my (ultra)lightweigt packs which only see the light of day every odd weekend.
This black beauty is sleek, inconspicous, tough as a nail, and also comfortable to carry. What more could you ask for?
Hardly lightweight by any standards, but, in my quiver of packs, this is the one that I could pass on to my children. And, I suspect this will be one of my final choices as well.
I also like the values of Goruck as a company, to build something that will last, to make a new classic.
There are plenty of other reviews out there on the web, singing its praise, so I will continue with a picture of the contents on a recent trip. It`s a mixture of bringing stuff back home to wash and electronics, and truth be told I did`t pay a lot of attention while packing.. But I`m suprised at how much I could fit in to those 26 liters.
It`s also a first attempt at using ThingLink. Now, let`s see, how do we do this thing?
/ odd
Sunday, February 26, 2012
Bikepacking
Spring is approaching.
Well, sort of.
So today I though I would share my bikepacking setup with you, in anticipation of great things/trips to come.
I used to have a road bike and a mountain bike. The mountain bike I had for years and pretty much all I did with it was to commute to work. The road bike was purchased on a whim as many of my friends got into racing and touring bikes, so I thought I would join them. Sad thing is, it never got much use.
So, after reading about the Salsa Fargo on sites like http://yetirides.blogspot.com/ and http://www.frontageroads.com/ I couldn`t help but think that this could be the one bike I was looking for (more info here http://salsacycles.com/bikes/fargo/) An all-round bike, which may not be the best in class at anything, but which does not do a bad job either. Which is very similar to my NDK Explorer kayak, by the way.
It also helped that I wanted to reduce the number of items in my possession. Two bikes out,one in.
So far, I really like the Fargo. It is really comfortable to ride, that steel frame and those big 29" wheels make for a pleasent journey. I have commuted to work, ridden singletracks and longer training runs, and it works nicely for all of these endeavours.
But, there is one dicipline where this bike should excel.
Bikepacking.
I had never heard of that word until it popped up in my research on the Salsa Fargo.
It resonates so very well with my ambition to have at my disposal the best tools for environmentally friendly human-powered transportation, be it on land or at sea. Aka bike and packraft :)
As I want to use this bike for lightweight bikepacking I wanted to kit it out with a frame bag, seat bag etc instead of the usual suspects, the bike panniers.
After a bit of research I ended up ordering a Revelate Designs Harness bag with an extra pocket for the handlebar. This would allow me to use drybags of various sizes ( I have a bucketload of drybags due to my seakayaking background) and also to have a quick and easy way of attaching my packraft to my bike. I am happy to report that my Denali Llama fits like a glove on my Woodchipper bar. Sweet!
My other bags I got from Porcelain Rocket. Scott has made three bags for me.
First of all a custom made frame bag, called the El Gilberto.
This bag has a horizontally divided compartment on the right hand side to make it easier to segregate gear. This inner divider can also be un-velcroed to make one, big inner if that should suit your gear better. The upper compartement may also be divided into three seperate compartements by a bit of velcro magic.The inside is bright yellow to make it easier to find stuff.
The El Gilberto also has a small opening, top front, to accommodate a hydration bladder hose.
The left hand side has one big pocket for maps or thin stuff.
The velcro used to attach the bag to the frame, by the way, is supersticky and takes a bit of strength to handle.
My other bag of choice is the Booster Rocket seatbag. My Salsa Fargo has the Thudbuster seat post and this seat bag works fine with it. It has a capacity of between 6 and 13 liters.
Thirdly I received a top tube bag.
All of this stuff, both Revelate Designs and Porcelain Rocket, seems burly and really well made.
More photos here.
The next step is to sort out some packing system, and go biking!
Well, sort of.
So today I though I would share my bikepacking setup with you, in anticipation of great things/trips to come.
I used to have a road bike and a mountain bike. The mountain bike I had for years and pretty much all I did with it was to commute to work. The road bike was purchased on a whim as many of my friends got into racing and touring bikes, so I thought I would join them. Sad thing is, it never got much use.
So, after reading about the Salsa Fargo on sites like http://yetirides.blogspot.com/ and http://www.frontageroads.com/ I couldn`t help but think that this could be the one bike I was looking for (more info here http://salsacycles.com/bikes/fargo/) An all-round bike, which may not be the best in class at anything, but which does not do a bad job either. Which is very similar to my NDK Explorer kayak, by the way.
It also helped that I wanted to reduce the number of items in my possession. Two bikes out,one in.
So far, I really like the Fargo. It is really comfortable to ride, that steel frame and those big 29" wheels make for a pleasent journey. I have commuted to work, ridden singletracks and longer training runs, and it works nicely for all of these endeavours.
But, there is one dicipline where this bike should excel.
Bikepacking.
I had never heard of that word until it popped up in my research on the Salsa Fargo.
It resonates so very well with my ambition to have at my disposal the best tools for environmentally friendly human-powered transportation, be it on land or at sea. Aka bike and packraft :)
As I want to use this bike for lightweight bikepacking I wanted to kit it out with a frame bag, seat bag etc instead of the usual suspects, the bike panniers.
After a bit of research I ended up ordering a Revelate Designs Harness bag with an extra pocket for the handlebar. This would allow me to use drybags of various sizes ( I have a bucketload of drybags due to my seakayaking background) and also to have a quick and easy way of attaching my packraft to my bike. I am happy to report that my Denali Llama fits like a glove on my Woodchipper bar. Sweet!
My other bags I got from Porcelain Rocket. Scott has made three bags for me.
First of all a custom made frame bag, called the El Gilberto.
This bag has a horizontally divided compartment on the right hand side to make it easier to segregate gear. This inner divider can also be un-velcroed to make one, big inner if that should suit your gear better. The upper compartement may also be divided into three seperate compartements by a bit of velcro magic.The inside is bright yellow to make it easier to find stuff.
The El Gilberto also has a small opening, top front, to accommodate a hydration bladder hose.
The left hand side has one big pocket for maps or thin stuff.
The velcro used to attach the bag to the frame, by the way, is supersticky and takes a bit of strength to handle.
My other bag of choice is the Booster Rocket seatbag. My Salsa Fargo has the Thudbuster seat post and this seat bag works fine with it. It has a capacity of between 6 and 13 liters.
Thirdly I received a top tube bag.
All of this stuff, both Revelate Designs and Porcelain Rocket, seems burly and really well made.
More photos here.
The next step is to sort out some packing system, and go biking!
Sunday, January 22, 2012
It`s the inside that counts
I like skiing. I don`t like blisters. Somehow these two get mixed up with my Scarpa T4 low-cuff telemark boots. I felt that was a bit strange as I have been extremely happy with my, now sadly disposed of, Scarpa T3 boots. These boots have seen me through a lot of fun stuff but were eventually falling to pieces. And the liners smelt like nuclear waste.
So. Off I went and got myself a pair of T4s, hoping they would be as good or even better than my T3s.
But so far I have been a bit disappointed. Because I get nasty blisters on the side of my feet.
I do not have blisterprone feet, as opposed to my wife who attracts them like honey to the bee.
One advice in a local shop was to drill a hole through the liner just next to where the pressure point is, but I decided to go for another option. A new, thermal liner.
This would have at least two nice benefits. A thermal liner is lighter and, more importantly, is custom fitted through the heating process, and should thus reduce the chance of blisters.
I have such a liner in my Scarpa T2 boots and really like them. Tried these in my T4, but felt they were too high for normal touring. Instead of blisters on my ankle, they would introduce blisters on my shin.
A bit of online research and a look in my wallet led me to Palau of France, and their TPM model which should be suitable for low-cuff telemark boots.
Palau TPM
A few days ago these arrived and below are some of my initial reactions.
For starters they are a lot easier to get in and out of than the stock liners, no disadvantage in really cold conditions, when you want your stuff to work with you, not against you. The stock liner is particularly difficult to get out of the shell. Not so with the Palau liners. So, round one. 1-0 in favor of Palau.
Like I mentioned above they are lighter. They weigh 242 grams each without a footbed, 270 grams with the original footbed that came with the stock T4 liners. In comparison the stock liners weigh 414 and 442 grams. Round two. 2-0.
The plastic shell, by the way,weighs 1246 gram each so in total the shell and palau weigh 1516 grams, the original version weighs 1688 grams. Not superlightweight, but plastic does provide more fun/stability going downhill.
The molding process was taken care of following Dave`s excellent step by step tutorial.
One disadvantage is that they are taller than the stock liners. How much of a problem that will turn out to be is something future trips will tell.
We went for a skitrip today, but with a 2.5 year old boy on, for him, long and wobbly skies, long distance skiing is not the first word that comes to mind.. I took off on a small hill nearby and managed to squeeze in a few turns. This was also the first time I tried skiing without the cuff on one boot. Worked quite well, but I guess 500 meters don`t give conclusive evidence :)
Looking forward to getting to know these liners. And go skiing!
So. Off I went and got myself a pair of T4s, hoping they would be as good or even better than my T3s.
But so far I have been a bit disappointed. Because I get nasty blisters on the side of my feet.
I do not have blisterprone feet, as opposed to my wife who attracts them like honey to the bee.
One advice in a local shop was to drill a hole through the liner just next to where the pressure point is, but I decided to go for another option. A new, thermal liner.
This would have at least two nice benefits. A thermal liner is lighter and, more importantly, is custom fitted through the heating process, and should thus reduce the chance of blisters.
I have such a liner in my Scarpa T2 boots and really like them. Tried these in my T4, but felt they were too high for normal touring. Instead of blisters on my ankle, they would introduce blisters on my shin.
A bit of online research and a look in my wallet led me to Palau of France, and their TPM model which should be suitable for low-cuff telemark boots.
Palau TPM
A few days ago these arrived and below are some of my initial reactions.
For starters they are a lot easier to get in and out of than the stock liners, no disadvantage in really cold conditions, when you want your stuff to work with you, not against you. The stock liner is particularly difficult to get out of the shell. Not so with the Palau liners. So, round one. 1-0 in favor of Palau.
Like I mentioned above they are lighter. They weigh 242 grams each without a footbed, 270 grams with the original footbed that came with the stock T4 liners. In comparison the stock liners weigh 414 and 442 grams. Round two. 2-0.
The plastic shell, by the way,weighs 1246 gram each so in total the shell and palau weigh 1516 grams, the original version weighs 1688 grams. Not superlightweight, but plastic does provide more fun/stability going downhill.
The molding process was taken care of following Dave`s excellent step by step tutorial.
One disadvantage is that they are taller than the stock liners. How much of a problem that will turn out to be is something future trips will tell.
We went for a skitrip today, but with a 2.5 year old boy on, for him, long and wobbly skies, long distance skiing is not the first word that comes to mind.. I took off on a small hill nearby and managed to squeeze in a few turns. This was also the first time I tried skiing without the cuff on one boot. Worked quite well, but I guess 500 meters don`t give conclusive evidence :)
Looking forward to getting to know these liners. And go skiing!
Subscribe to:
Posts (Atom)